kicad-project-template
Introduction
The KiCAD project template is great for getting up and going quickly on your KiCAD PCB projects and cuts out the repeated setup you'd normally have to run through. The default board stackup follows the PCBWay standard stackup with the smallest design tolerances possible - giving you the most accomodating design experience possible without costing too much for fabrication. This template also has the necessary scripts and workflow files for automated releases (CI/CD) on Github where it will generate your BOM, .step, Gerbers and Schematic for you and automatically upload these to a Release that has been tagged with your boards Revision.
The template can be found on Github in the kicad-project-template repository
Setup
To make the template your own you will need to update the name of a few files and edit schematic sheet settings. Each step is outlined below.
File naming
The first step is to update file names. Inside the template
is a folder called kicad-project-template. Update the name to be your desired project name (e.g. EX_PROJECT). Next you need to update the .kicad_pro, .kicad_sch and .kicad_pcb
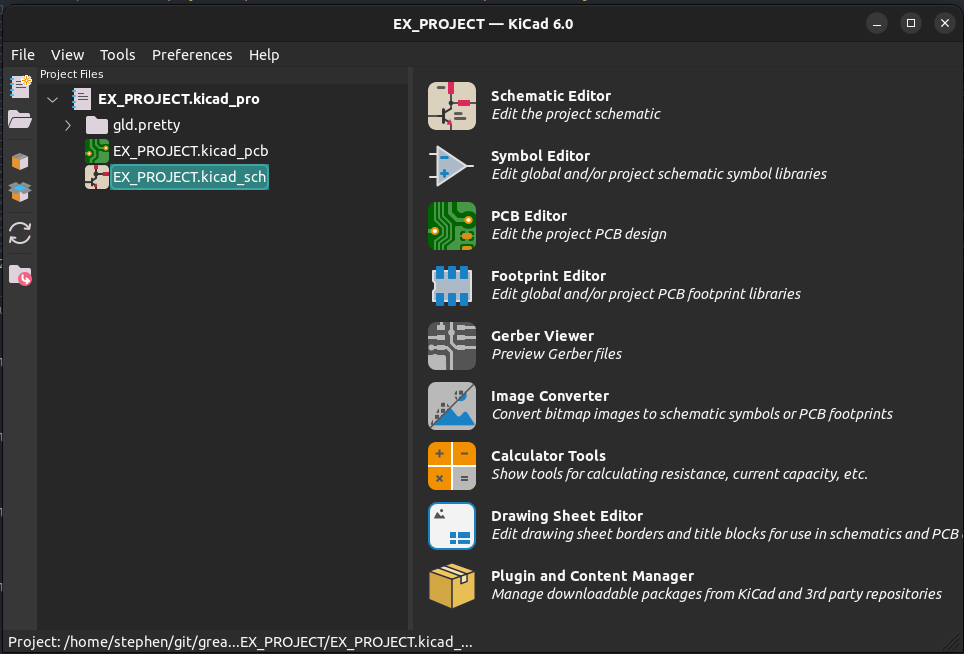
files found inside the project folder we just renamed. Rename all three files to be the same as the folder name (e.g. EX_PROJECT.kicad_pro). With all of these file names updated you should
now be able to open the project in KiCAD and see both the Schematic and PCB Documents.
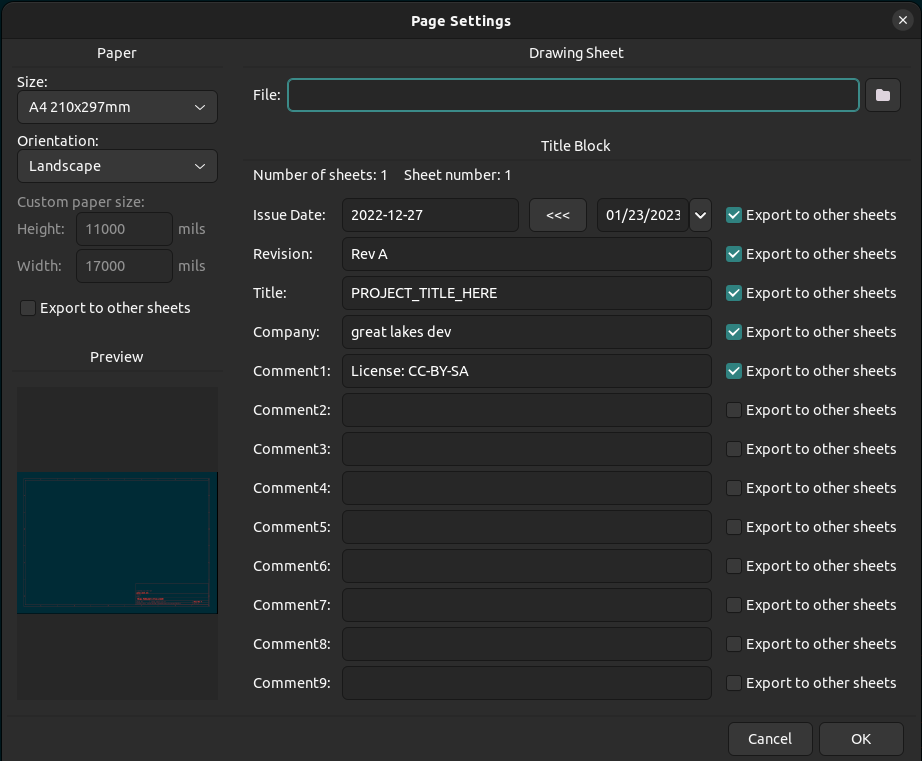
Page settings
Next we need to update Schematic and PCB page settings. Several variables are already set such as a company name, license type, revision etc. and these show up in the title block in the bottom right of the schematic
and pcb sheets. These settings are updated by opening the EX_PROJECT.kicad_sch and EX_PROJECT.kicad_pcb file and then navigating to File > Page Settings.
Bill of Materials
There are several ways to generate a BOM in KiCAD but we will be using our own custom python script to generate ours. A util/ folder is included in the template with a handful of helper scripts used for parsing the
XML based netlist generated by KiCAD. These scripts provided functions and classes called by our bom_csv_grouped_by_mfp.py script which generates a comma separated BOM with the line items grouped by the MFP
(Manufacturer Part Number) field. Some components like ICs will have a MFP in the "Value" field but other items such as generic LED and passive symbols have no actual MFP associated with them. When trying to share and order
from these generated BOMs the intended components to be used are not captured. KiCAD does not know about or include an MFP field on it's components but we can add it!
You can skip adding the MFP if you'd like and the included script in util/ will still generate a useful BOM with parts grouped by Name, Footprint and Value.
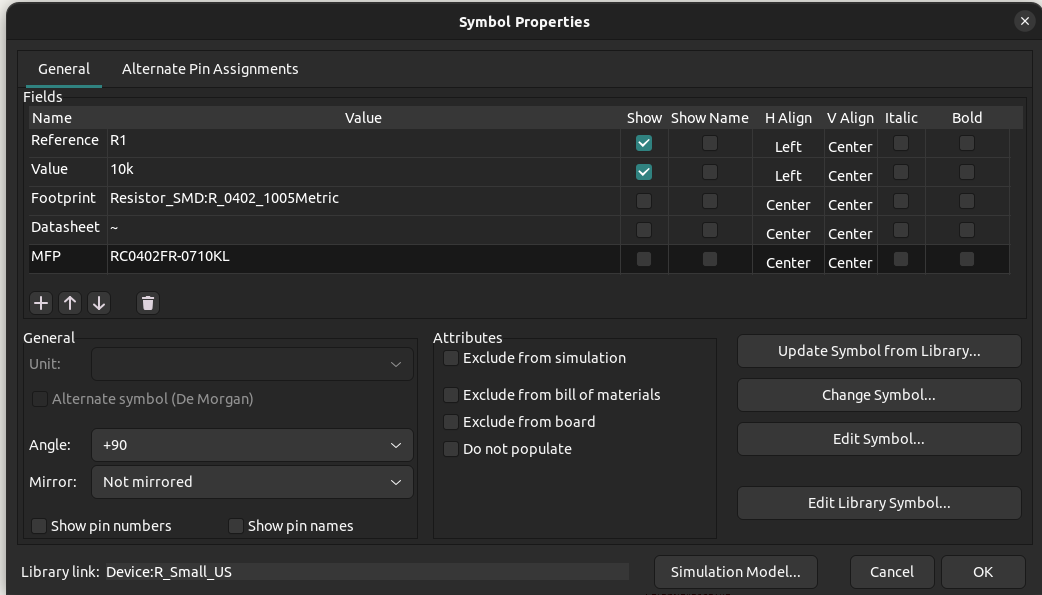
Adding the MFP field
As previously mentioned the MFP field is not present in KiCAD provided components and must be manually added. It can be tedious at first but greatly improves the usability of the final BOM. The MFP field can be added to any
part by selecting the component in the schematic, pressing E, and then adding the MFP field name and part number value.
Generating BOMs
To load and use the bom_csv_grouped_by_mfp.py script, open the PCB file and go to Tools > Generate BOM.... From here there will be a couple scripts already loaded and you are welcome to use those if they meet your needs.
To use our template script click the + in the bottom left of the BOM generator scripts pane to load a new BOM Generator. Navigate to the util/ folder and select the bom_csv_grouped_by_mfp.py script.
Once loaded, press Generate in the bottom-right of the window. You should now have a file called EX_PROJECT.csv inside the
EX_PROJECT/ folder - that's your BOM!

3D Models
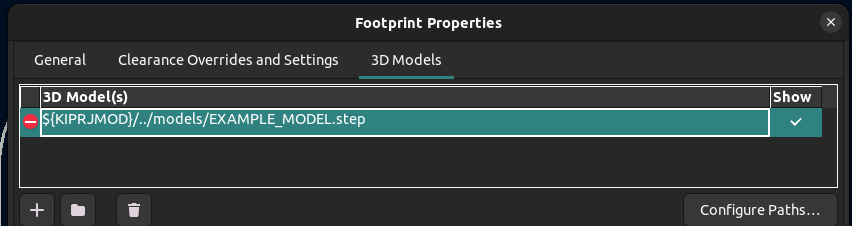
In some cases you will use a component that does not have a 3D model built-in to KiCAD. You can place these .step or .wrl files in the models/ folder.
To reference them you can use the KiCAD Project variable (KIPROJMOD) to set a relative path to these models when updating the pcb component properties by selecting in the PCB doc,
pressing E, and then adding a new file path for your model. Ex. ${KIPRJMOD}/../models/EXAMPLE_MODEL.step
Github Releases
The template has a preloaded workflow for use with Github runners which allows a consistent and hands-free release process for generating a release BOM, Schematic, Gerbers, and .step file. The integration is triggered
in two ways - either manually kicking off the action from the Github Web UI (this is default behavior) or it's triggered on pushes to the main branch.
Both options are explained in further detail below. The release will be tagged and named whatever is set as the Revision in the EX_PROEJCT.kicad_sch page settings. When making releases you MUST change/increment
the Revision value or delete any old releases/tags that might have the same name, otherwise the workflow will fail.
Configuration
The workflow is configured by editing the ci.yml file located in .github/workflows/. At a minimum we need to update the project name env variable to match the folder and file renaming
we did previously (EX_PROJECT).
env:
  PROJECT_NAME: "EX_PROJECT"
Lastly we need to configure the CLI tool. As of KiCAD v7 the the kicad-cli utility was added allowing the generation of KiCAD build outputs from the command line.
CLI_TOOL: "kicad-cli"
Manual Release
The default setup of the workflow is for manually triggering of a release from the Github Web UI. The configuration at the top
of the .github/workflows/ci.yml is set to workflow_displatch to enable this feature.
on:
  # Enable workflow only when manually called
  workflow_dispatch
  # OR
  # Enable workflow on pushes to main and dev
  # push:
    # branches: [ main, dev ]
Release on Push
The second option for Github releases is to create a new relase on push to main. Meaning any commit on the main branch will create a new release. If you intend to use the on push
method and want to make multiple incremental changes/pushes to your design it's recommended you work out of a dev branch and then PR the changes into main when you are ready to make a release.
To enable the 'Release on Push' functionality we need to edit the ci.yml and uncomment the push and branches lines. Comment out the workflow_dispatch line.
on:
  # Enable workflow only when manually called
  #workflow_dispatch
  # OR
  # Enable workflow on pushes to main
  push:
    branches: [ main ]